There are three parts to installing Konica Minolta printers on your computer.
Windows Instructions in PDF
Part 1: Install PaperCut
- Type (or copy+paste) \\printers\PCClient\win\client-local-install into the search bar next to the Start menu on your computer (lower left corner of your monitor), and press Enter.

-
Complete the installation, checking the box to Launch client and verify identity.
- Then enter your Puget Sound login, checking the Remember my identity box.

Part 2: Install PaperCut Print Deploy Client
-
Go to http://printers.pugetsound.edu/print-deploy/client-setup/windows.html
-
Click Download.
-
Go to the downloaded file file and double-click to run and complete the installation.
-
The PCS-Release printer will be installed automatically, and will appear as a choice when you hit Print.
To use PCS-Release, select it as your printer, choose any options like double-sided, color, hole-punching, or stapling, and print as normal. Then go to any Konica copier on campus, login with your Copier ID (or your Puget Sound login), and release the print.

Part 3: Add any additional Konica Minolta printers
To print directly to your local Konica copier without having to login and release the print in person, you can add your local printer from the list of options. You can add or delete from your list of printers at any time.
-
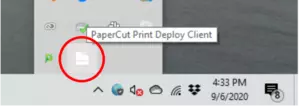
In the lower right corner of your computer taskbar, find the Print Deployment icon. Right click and choose View My Printers.

-
A new window will open, showing the list of installed Konica Minolta printers on your computer.
-
Select Add Printers from the navigation bar on the left. This will show a list of all available Konica printers.
-
Find the printers that you would like to be able to print directly to and click Install.

-
Print as normal, selecting the printer you would like to print directly to in the drop down list.