You are welcome to use the software you feel most comfortable with to create your poster, but the file you submit for printing needs to be saved as a PDF that matches the size of your poster (e.g. PDF must be 36x48 if you want your poster to be 36x48.) Below are lists of software that we recommend (or don’t recommend.) This is not an exhaustive list and does not include all possible options.

Recommended Software:

The following software is some of the most frequently used for creating Presentation Posters.

Microsoft PowerPoint logo
Apple Pages logo
Adobe Illustrator CC logo
Adobe InDesign CC logo
Scribus logo
Inkscape logo
  • Microsoft PowerPoint
  • Apple Pages (available on Mac only)
  • Adobe Illustrator
  • Adobe InDesign
  • Scribus (open source software - can be downloaded for free)
  • Inkscape (open source software - can be downloaded for free)


Not Recommended:

The following software either isn't recommended, or simply won't work for the purpose of designing a presentation poster.

Apple Keynote logo with prohibition sign overlaid on top, indicating the software should not be used for creating presentation posters
Microsoft Word logo with prohibition sign overlaid on top, indicating the software should not be used for creating presentation posters
Microsoft Excel logo with prohibition sign overlaid on top, indicating the software should not be used for creating presentation posters
  • Apple Keynote
  • Microsoft Word
  • Microsoft Excel

These are basic instructions for saving your file as a PDF.  The steps could vary depending on what program you're using.

Windows

  1. Go to File

  2. Choose Save As

  3. Choose where you want to save your PDF

  4. From the dropdown menu labeled Save as type, choose PDF (*.pdf)

  5. For best quality, select Standard (publishing online and printing)

  6. Click Save

Be sure to open and review your PDF before submitting your order for printing.


Mac

  1. Go to File > Page Setup.

  2. Make note of the size of the document or slide (your poster) and click the Options button. A new window will open.

  3. Click the plus icon in the lower left.

  4. In the Paper Size field enter your slide’s shortest dimension as the width, and the longest dimension as the height. (It does not matter if your poster is portrait or landscape: shortest=width, longest=height).

  5. Select your new custom size, and click Portrait or Landscape to match the layout of your poster.  Then, click OK.

  6. Go to File > Print. A new window will open.

  7. In the lower left corner of the window, click the PDF button and choose Save as PDF.

  8. In the new window that opens make sure that “Hide extension” is unchecked.  To view this option, it may be necessary to expand the window by clicking the small triangle next to your file name.  The triangle should be pointing down.

Be sure to open and review your PDF before submitting your order for printing.

When printing wide format prints, including presentation posters, we need the PDF to match the size that has been requested. The best way to ensure this happens is to create your poster at the size you want printed from the start. There is no standard size for presentation posters, but there may be size requirements for presenting at various conferences, symposiums, or class assignments. Checking size requirements before you begin creating your poster will save you time and effort. Some of the sizes we often print, and offer templates for are:

  • 40x30
  • 42x30
  • 42x36
  • 48x36
  • 48x42
  • 56x36
  • 60x36

If you need a different size, please feel free to modify any of our templates to match the size you need.

After saving your poster as a PDF, you should check to make sure that it saved at the correct size.  Also check that everything looks as it should before submitting your order.

To Check the Size of your PDF (Windows or Mac)

Open your PDF in Adobe Acrobat or Foxit PDF Reader (available through vDesk).You can also use the professional versions of this software: Acrobat Pro and Foxit PhantomPDF.

Move your cursor to the lower left corner of your screen.  A small box will appear, displaying the dimensions of your PDF. (see example below)

screenshot showing how to check the dimensions of a PDF in Adobe Acrobat or Foxit PDF Reader.


Alternate Method for checking PDF size (Mac only)

In addition to the previous method, Mac users can also use the following method to check the size of a PDF:

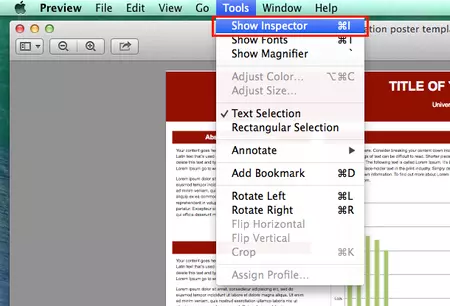
  1. Open the PDF in Preview

  2. Go to Tools > Show Inspector
    screenshot showing the first step for checking the dimensions of a PDF on a Mac computer
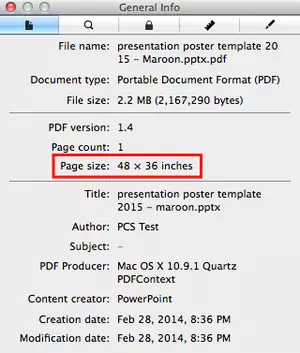
  3. A new window will open.  The measurements for Page Size indicate the poster's size.

    screenshot showing the second (and last) step for checking the dimensions of a PDF on a Mac computer

Adding logos to your poster is a great way to indicate what institutions, organizations, or businesses you are affiliated with. Most institutions have branding guidelines that cover the usage of their logos, and University of Puget Sound is no exception.

Below are a few examples of correct and incorrect usage of the university logo.  For more comprehensive guidelines, visit the Office of Communications.

Correct Usage

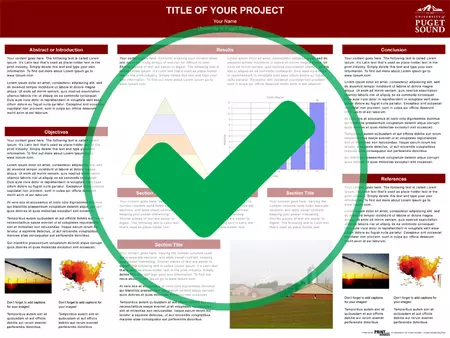
Please do include the university logo.

Presentation Poster mockup illustrating correct usage of university logo. A single instance of the University of Puget Sound school logo is used on the poster. A large green check mark is overlaying the mockup, indicating that this is an appropriate usage of the university logo.


Incorrect Usage

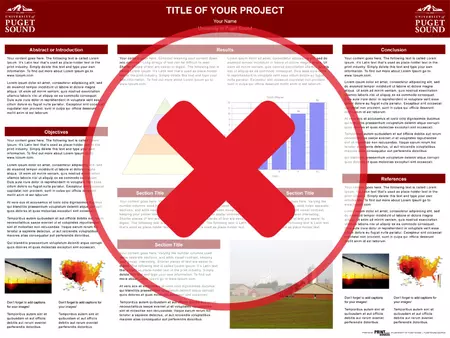
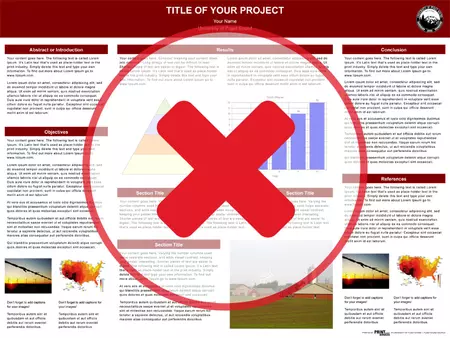
Do not use the university logo more than once on a poster.

Presentation Poster mockup illustrating correct usage of university logo. The University of Puget Sound school logo is placed twice on the poster, once in each of the upper corners of the poster. A large red letter X is overlaying the mockup, indicating that this is an incorrect way to use the university logo.


Do not use the university seal on your poster.
The university seal is reserved exclusively for use by the Office of the President.

Presentation Poster mockup illustrating incorrect logo usage. In the example, the university seal is used instead of the university logo. A large red letter X is placed over the mockup indicating that this is incorrect.

It’s important to review and proof read your poster prior to submitting it for printing. Below are some suggestions for doing so, based on frequent questions and issues come up.

  • Review your poster using the PDF.
    Since we will use the PDF you provide to print your poster, it’s best to use the PDF for determining whether everything looks ready for printing.
     

  • What font size should I use?
    The specific size of font you use depends on the specific font you pick. It also depends on how much content you have and the size of your poster. However, we recommend using at least 14pt or larger for most content.
    To check to see if the font size looks okay, print your poster out on an 8.5x11 sheet of paper (shrink it down to fit the whole poster on a single page.) Does it look oddly large on the page? Is it small and hard to read? If the font is readable and looks reasonably sized on a regular sheet of paper, it will likely also look appropriate when the poster is printed at the larger size too. If it doesn’t look okay, consider using a larger or smaller font size as needed.
     

  • Will my images look pixilated on the poster?
    It can sometimes be hard to tell if an image that looks good on a screen will still look good when printed out, especially at a large size. Similarly to checking font size, printing your poster on an 8.5x11 sheet of paper will give you a pretty good idea of how it will look at full size. Even though the 8.5x11 sheet is much smaller than your final poster, people usually stand further away when reading large posters than they would when reading a regular sheet of paper. You can also print out a black & white print of the images your concerned about at roughly the same size you want to print them to help give you an idea of how they will look.
     

  • Is any of your text cut off?
    One of the most common mistakes is text that gets cut off at the end of a text box, or covered up by part of an image or graphic. Review all of your text and make sure nothing is missing, cut off, or covered up. Although not a guarantee, one quick way to do this is to check that all your paragraphs end in a period. If there isn't a period at the end of a paragraph, it might be an indication that text is cutoff.
     

  • Is there anything missing?
    Most of the time posters save to PDF without any issues. However, sometimes graphics, images, or unusual fonts might not save correctly. To be sure everything looks as it should, it’s always a good idea to do a quick comparison between your PDF poster and the poster in the software you used to create it. Do all of your fonts look correct? Are all of your graphics and images there? Is everything in the right location on the poster?
     

  • Is your PDF the correct size?
    It’s important to make sure your PDF is the same size you want it to printed. Be sure to check that you saved the PDF at the correct size. (See the Choosing & Checking Your Poster Size section for instructions on how to check the PDF size.)

Academic program/class Order

(submitted as part of a class assignment that is being paid for by an academic department).

Check with your professor or advising faculty member find out what process has been arranged for your class or program.

If you don’t have specific instructions from your professor, please send us an email with:

  • Your poster saved as a PDF
  • What class this is for
  • Which professor you’re working with
  • Dimensions of your poster (e.g. 42x36, 48x36, etc.)


Personal Order *

(you’re paying for the order yourself)

If you’re paying for the order yourself, submit the order online through our Online Print Shop. (You can also find it through the Okta single sign-on (look for PCS Print Shop).

* Pre-payment is required for all personal orders. When you submit your order, you can choose to pay online with credit or debit card, or you can choose to stop by Print & Copy Services in person to pay. We accept credit and debit cards, as well as cash for in-person payments.


Charged to department or student club

Please submit an order through the Online Print Shop as mentioned above for the personal orders. Please note, you will need to know the department’s or club’s SpeedChart number (so we know who to charge for the order.) If you don’t have the SpeedChart number, you can contact the Office of Finance and ask them to look it up for you.


If you have any questions or difficulty submitting an order, please don’t hesitate to contact us!