Print & Copy Services
Mailing Address
1500 N. Warner St. #1005
Tacoma, WA 98416-1005
Physical Address
3210 N. 15th St.
Tacoma, WA 98416
Walk-in Hours
All orders should be placed through our Online Print Shop, and file(s) uploaded along with your order. Please see below for the steps needed for submitting an order.
Step 1: Save as a PDF
All files should be saved as PDFs when submitting an order.
If absolutely necessary, we can print from JPEGs (and other image files), PowerPoint slides, Word Documents, Illustrator, InDesign, Photoshop, plus, any other file formats that are not PDFs, however doing so may delay turnaround time, or result in changes to document layouts, fonts, and colors. For this reason, PDFs are strongly preferred.
Step 2: Look it over
Open up the file to double check everything.
- Is the document the right size?
- Does it look correct?
- Not too blurry or pixilated?
- Nothing cut off or missing?
- Background colors in place?
What you see is how your file will print!
Step 3: Submit your order
Department/Club Orders
Submit your order through the Online Print Shop, and you're done! We'll let you know when your order is ready.
Personal Orders
Submit your order through the Online Print Shop, then select to either pay online, or in-person at Print & Copy Services. Some types of orders are more complex and require us to review them in order to determine the cost. In those cases, we will email you with a total. Either way you will still be able to either pay online or in-person (we'll email you a link for payment if the cost requires review on our end.)
Note: If your personal or university order does not require printing (e.g. lamination of an already existing item, or photocopying something already printed), please submit your order online, then drop off your physical item(s) at Print & copy Services.
Step 4: Pre-Pay (Personal Orders Only)
We require pre-payment for all personal orders. If you have already paid online, you are good-to-go for payment. If you choose to pay in-person at Print & Copy Services, please stop by during our regular hours (Monday–Friday, 8am–5pm). We accept cash, checks, Visa, Mastercard, American Express, and Discover.
- Stop in to pre-pay. (If you didn't already pay online)
- We accept cash, checks, credit or debit.
- Once you have paid for your print request, we will begin processing your order. We'll let you know when your order is ready.
For personal orders, we accept cash, checks, and debit/credit cards, including Visa, MasterCard, Discover, and American Express.
For university departmental or club orders, you need to provide your department or club SpeedChart number when you place your order online. If you don't know your SpeedChart, you can contact the Office of Finance and ask them to look it up for you.
Yes. You can use your student PrintGreen credits to request basic 8.5x11 prints in color or black & white.
Use the Student Print Green Account Orders form in the Online Print Shop to place your order. Black & White prints cost 1 print credit per side of a page, and Color prints cost 5 print credits per side of a page.
In addition to color and black & white options, you can also choose to print single-sided or duplex, and request 3-hole punching and/or stapling in the upper left corner for no additional cost.
The cost of your order depends on what you are having printed. Please feel free to contact us if you'd like an estimate or quote. Some prices can be given over the phone, but we request that you email us at print@pugetsound.edu for quotes on more complex orders.
Additionally, most of our online order forms will preview the price for you before you place your order. If you'd like an estimate on your order prior to printing, just ask!
If possible, we prefer to have at least two full business days (48 hours) to complete an order, though orders can often be completed in 24 hours or less, if needed. Larger orders and orders that require additional finishing, such as cutting or folding, could take longer.
Rush orders (orders with less than a 2-day turnaround) will be charged a rush fee. We also offer a discount on wide format orders with a due date at least 2 weeks out.
You can expect your order to be ready by the due date you give us.
We will notify you by email when your order has been completed. We are available by email at print@pugetsound.edu or by phone during business hours at (253) 879-3737, if you would like to check on the status of your order.
We try to get as close to the color on the screen as possible, however it's possible it might not be an exact match. Computer screens display a much broader range of color, than printers can produce. Plus, not all screens display the exact same range of colors, or might be calibrated differently.
If you are concerned about how color will be reproduced, we encourage you to request to see a proof prior to your full order being printed.
Yes. We can print presentation posters in just about any size you need. The most common sizes for presentation posters are 42x36, 48x36, 48x42, and 56x36. If there is a specific size required for a conference or assignment, please be sure to design your poster to be the same size you need.
PDFs are required for most orders.
PrintGreen orders for students can accept a variety of file types. However, to ensure that your prints come out the way you expect, we still strongly recommend PDFs for all orders.
If you need assistance saving your file(s) as PDFs, please don't hesitate to contact us or stop by!
In most cases, you can save your file(s) as a PDF by going to File-->Save As, then choosing PDF from the dropdown list of options. Some programs have the option to Export to PDF, instead of Save As.
Mac users can also Print to PDF from most programs.
For best results, we strongly encourage saving your file as PDF. If there's a reason saving your file as a PDF won't work, please contact us to discuss options. We're happy to work with you to figure out the best way to get your project printed.
Many images taken from the web are very low resolution and will look pixilated when printed. We recommend printing a black & white version in one of the computer labs around campus before printing a color version. If it looks pixilated in black & white, it will look pixilated in color too. Additionally, please save any image files as PDFs before submitting them for printing.
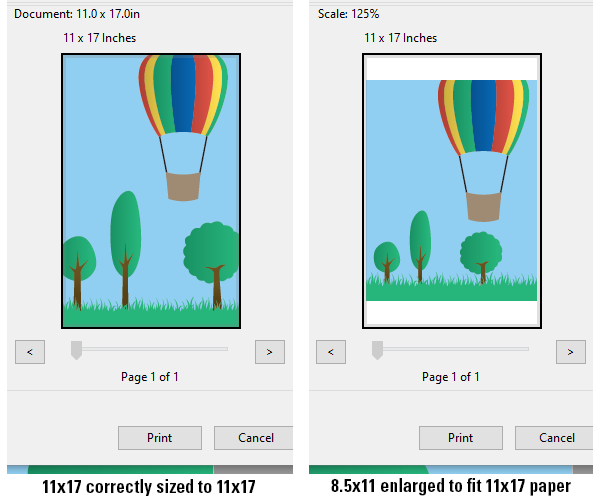
We can enlarge it as closely to 11x17 as possible, but there will be large white margins on two of the sides (see below). We strongly recommend creating your poster at the size you intend to print it.
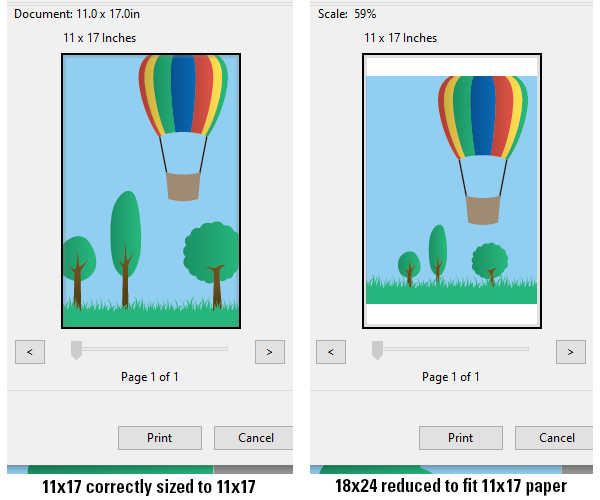
We can reduce the print to fit as closely to 11x17 as possible, but there will be large white margins on two of the sides (see below). We strongly recommend creating your poster at the size you intend to print it.
Any software that will allow you design your wide format print at the same size you want it printed will work.
Most commonly used are:
- PowerPoint
- Publisher
- Illustrator
- InDesign
- Pages
If you are printing a presentation poster, please review our presentation poster checklist.
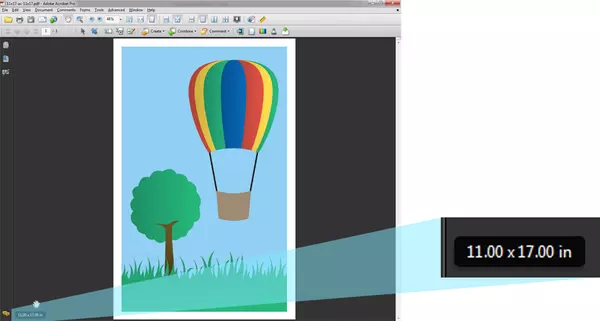
- Open your PDF in Adobe Acrobat or Foxit PDF Reader (both PDF readers are free).
You can also use the professional versions of this software: Acrobat Pro and Foxit PhantomPDF. - Move your cursor to the lower left corner of your screen. A small box will appear, displaying the dimensions of your PDF. (see example below)
Alternate method for Mac users
In addition to the previous method, Mac users can also use the following method to check the size of a PDF:
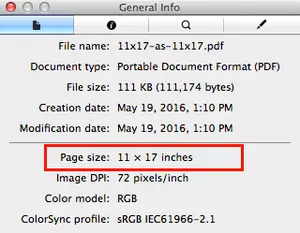
- Open the PDF in Preview
- Go to Tools > Show Inspector
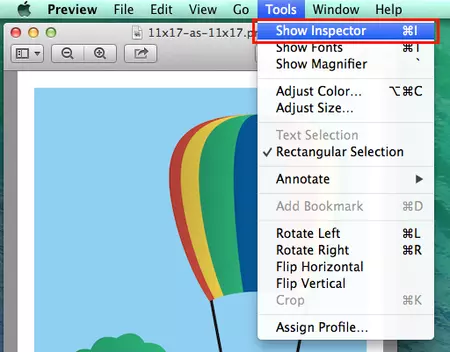
- A new window will open. The measurements for Page Size indicate the PDF's size. In this example, the PDF is sized for 11x17.
A bleed is the effect achieved when graphic elements go to the edge of a printed piece. This could include photos, patterns, text, background colors, and anything else that has been printed to the edge.
Our standard paper sizes are:
- 8.5x11 (aka "Letter")
- 8.5x14 (aka "Legal")
- 11x17 (aka "Tabloid")
- 12x18
- 13x19
- The largest standard size we can print is 13" x 19".
- The largest we can print on our wide format printers is 54" x 1200" (approx. 4.5 feet x 100 feet). Not all sizes are available for all media types. We recommend checking with us if you're unsure what size you need for your wide format print.
It depends. We strongly encourage printing on the paper we regularly have in stock in our shop. Your paper must be okay for printing on laser printers. Not all paper can be used on all types of printers. Some paper is too heavy. Some paper has fibers, unusual coatings, or metallic finishes that can harm our printers. We offer a wide variety of paper in-house. Please stop by to see what we have available!
Probably not. Most material for iron-on transfer (such as for making t-shirts) requires an inkjet printer. All of our printers are toner-based laser printers and get too hot to print onto the iron-on transfer material.
Some transfer material may work with laser printers, but we would need to review packaging the material came in to determine if it's safe to use on our printers.
We have a high-quality cardstock that produces excellent looking photos that can be printed in a fairly quick timeframe.
We also have a high-gloss large format paper for larger photo prints, but which typically requires additional time for printing.
We offer colored paper in pastels, Astrobrights, Royal Fiber, and Astroparche. Most colors are available in both text weight paper and in cardstock. Please stop by Print & Copy Services to see options in-person or view our color Paper Selection online.
For black & white prints we typically use standard white 20lb. copy paper.
For color prints we use a high-quality 70lb., white, uncoated paper, which has a semi-glossy appearance after printing. It's heavier than standard copy paper, but not as heavy as cardstock (can be easily folded). If you are printing in color, your print will automatically be printed on this paper, unless otherwise requested.
We also have available:
- Cardstock
- Colored paper
- Linen
- Stationery paper
- Rite in the Rain paper
- PVC paper and cardstock (a waterproof alternative to printing and laminating)
- Adhesive vinyl (great for vinyl stickers, labels, signage)
Please stop by the Print & Copy Services office to look through our sample book of paper options, or view our color Paper Selection online. If there's something specific you're looking for, just let us know!
Our services are available to everyone, including the entire campus community ( students, staff, and faculty), guests to our campus, our local neighbors, folks in the broader Tacoma community and Puget Sound region, and beyond.
We do not have any personal access computers or copiers for you to print directly. Please place any orders for printing through the Online Print Shop.
- To use your student print credits, please submit an order using the Student Print Green Account Orders order form.
- Department or club orders should be submitted using one of the forms in the Department and Club Account Orders section. All files must be saved as PDFs.
- Personal orders should be submitted using one of the forms in the Cash/Credit Orders section. All files must be saved as PDFs.
Yes. We offer fastback binding (like the coursepacks in the bookstore), plastic comb-binding, and spiral binding.
- Fastback binding is the more cost-effective option, and works best with a minimum of 30 sheets to be bound.
- Comb-binding is a good option if you think you might need to add more pages later.
- Spiral binding works best if you want to be able to flip your pages behind the previous one for easier reading.
If you're unsure which option is best for your needs, please don't hesitate to reach out.
Distributing posters is not one of the services we offer. Student groups and clubs should contact ASUPS for questions about campus poster distribution.
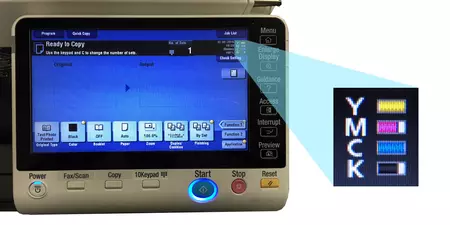
All copiers will display a message on the main screen, indicating when toner is getting low. When you see this message, be sure to check that your office has a spare toner cartridge on hand for when the toner runs out.
Copiers also have a small toner meter on their main screen, indicating the approximate toner level in the copier. Color copiers will display all four toner colors, and black & white copiers will only show a meter for black toner. (The specific location of this meter depends on the model of copier.)
Please note:
- You do not need to replace the toner until the toner completely runs out. The copier will display a message when it's time to do so.
- Prints on copiers do not fade as toner runs low. If your copies do begin to look faded or streaky, please let us know. This is an indication that maintenance may be needed for the copier.
- If you need a replacement toner cartridge, you can order one using the Copier Supplies order form in the Online Print Shop or by sending us an email at print@pugetsound.edu.
Follow the on-screen instructions on the copier. There are also instructions on the box the toner comes in. If you have any questions, or are unsure how to replace the toner in your copier, please contact Print & Copy Services.
The screen on the copier will tell you what colors are needed: Cyan, Magenta, Yellow or Black. Some color copiers will only use an initial to indicate which color is needed:
- C is for Cyan
- M is for Magenta
- Y is for Yellow
- K is for Black
If you have a black & white copier, it will simply say that it needs more toner.
The copier will display a message on the main screen when the waste toner cartridge is close to being full (similar to when toner is starting to get low). When this message appears, please contact Print & Copy Services and we will replace the waste toner cartridge for you.
Please note: The Waste Toner Cartridge can be replaced any time after the message about it being close to full appears. It is not necessary to wait until it is completely full to replace it.
We strongly recommend having us replace it for you. The waste toner cartridge contains loose waste toner, which if not handled properly could spill and cause a mess.
However, if needed the waste toner cartridge can be replaced by following the steps on the copier screen and on the box for the replacement waste toner cartridge. Do not attempt to replace the waste toner cartridge unless you have an empty replacement cartridge readily available.
Follow the instructions located on the inside of the finisher door. Specific instructions vary between models of copiers, however the basic steps are as follows:
- Open the finisher door.
- Pull out the empty staple cartridge carrier.
- Replace the empty cartridge with the new cartridge.
- Place cartridge carrier back in copier and close finisher door.
Do not attempt to refill the staple cartridges with individual staples. Be sure to follow the specific instructions for replacing staples as they are displayed on the inside of the finisher door of your copier.
If you are unsure about replacing staples in your copier, please contact Print & Copy Services.
No. Copiers staples are only designed to fit in the staple cartridges for each respective copier. Do not remove the staples from the cartridges.
If you have any additional questions, contact Print & Copy Services at print@pugetsound.edu or 253.879.3737.